plugin-legacy 内置插件详解
背景
Vite 的浏览器兼容性
用于生产环境的构建包会假设目标浏览器支持现代 JavaScript 语法。默认情况下,Vite 的目标是支持包含 原生 ESM 语法的 script 标签、原生 ESM 动态导入 和 import.meta 的浏览器,包含如下:
| Browser | Version |
|---|---|
| Chrome | >= 87 |
| Firefox | >= 78 |
| Safari | >= 14 |
| Edge | >= 88 |
你也可以通过 build.target 配置项 指定构建目标,最低支持 es2015(ES6,基本作为业界标准)。
请注意,默认情况下 Vite 只处理语法转译,且 默认不包含任何 polyfill。你可以前往 Polyfill.io 查看,这是一个基于用户浏览器 User-Agent 字符串自动生成 polyfill 包的服务。
传统浏览器可以通过插件 @vitejs/plugin-legacy 来支持,它将自动生成传统版本的 chunk 及与其相对应 ES 语言特性方面的 polyfill。兼容版的 chunk 只会在不支持原生 ESM 的浏览器中进行按需加载。
执行流程
默认情况下,这个插件将做如下几件事情:
- 在最后的构建产物中会通过 @babel/preset-env 和生成 SystemJS modules (依旧支持代码切割)的方式为每一个
chunk生成特定的legacy chunk。 - 生成一个
polyfill chunk会包含SystemJS runtime和指定浏览器需要的 polyfills以及源码中实际使用的 polyfills。 - 在已生成的
HTML模块中注入<script nomodule>标签,目的是为了可选择性的加载polyfills和仅在没有广泛支持可用功能的浏览器中使用legacy bundle。 - 注入
import.meta.env.LEGACY环境属性,这个属性值在legacy产物中为true,其他情况下为false。
实现思路
从入口处可以看出 @vitejs/plugin-legacy 模块导出格式如下:
// @vitejs/plugin-legacy

function viteLegacyPlugin(options = {}) {
  const legacyConfigPlugin = {
    // ...
  };

  const legacyGenerateBundlePlugin = {
    // ...
  };

  const legacyPostPlugin = {
    // ...
  };

  return [legacyConfigPlugin, legacyGenerateBundlePlugin, legacyPostPlugin];
}

export { cspHashes, viteLegacyPlugin as default, detectPolyfills };也就是说使用 @vitejs/plugin-legacy 模块本质上会导入三个插件 legacyConfigPlugin、legacyGenerateBundlePlugin、legacyPostPlugin。以下逐一分析每一个插件具体做了什么。
legacyConfigPlugin
源码结构很简单:
const genLegacy = options.renderLegacyChunks !== false;

const legacyConfigPlugin = {
  name: 'vite:legacy-config',
  config(config2, env) {
    if (env.command === 'build' && !config2.build?.ssr) {
      if (!config2.build) {
        config2.build = {};
      }
      if (!config2.build.cssTarget) {
        config2.build.cssTarget = 'chrome61';
      }
      if (genLegacy) {
        overriddenBuildTarget = config2.build.target !== void 0;
        config2.build.target = [
          'es2020',
          'edge79',
          'firefox67',
          'chrome64',
          'safari12'
        ];
      }
    }
    return {
      define: {
        'import.meta.env.LEGACY':
          env.command === 'serve' || config2.build?.ssr
            ? false
            : legacyEnvVarMarker
      }
    };
  },
  configResolved(config2) {
    if (overriddenBuildTarget) {
      config2.logger.warn(
        colors.yellow(
          "plugin-legacy overrode 'build.target'. You should pass 'targets' as an option to this plugin with the list of legacy browsers to support instead."
        )
      );
    }
  }
};插件实现逻辑比较简单,可以概括如下三点:
css的兼容性版本默认为chrome61。直观的示例是当你要兼容的场景是安卓微信中的webview时,它支持大多数现代的JavaScript功能,但并不支持 CSS 中的#RGBA十六进制颜色符号。这种情况下,你需要将build.cssTarget设置为chrome61(chrome 61以下的版本不支持#RGBA),来防止ESbuild将rgba()颜色默认转化为#RGBA十六进制符号的形式,文档参考(若用户已配置,那么则不做处理)。以下
Esbuild官方也做出了解释和建议: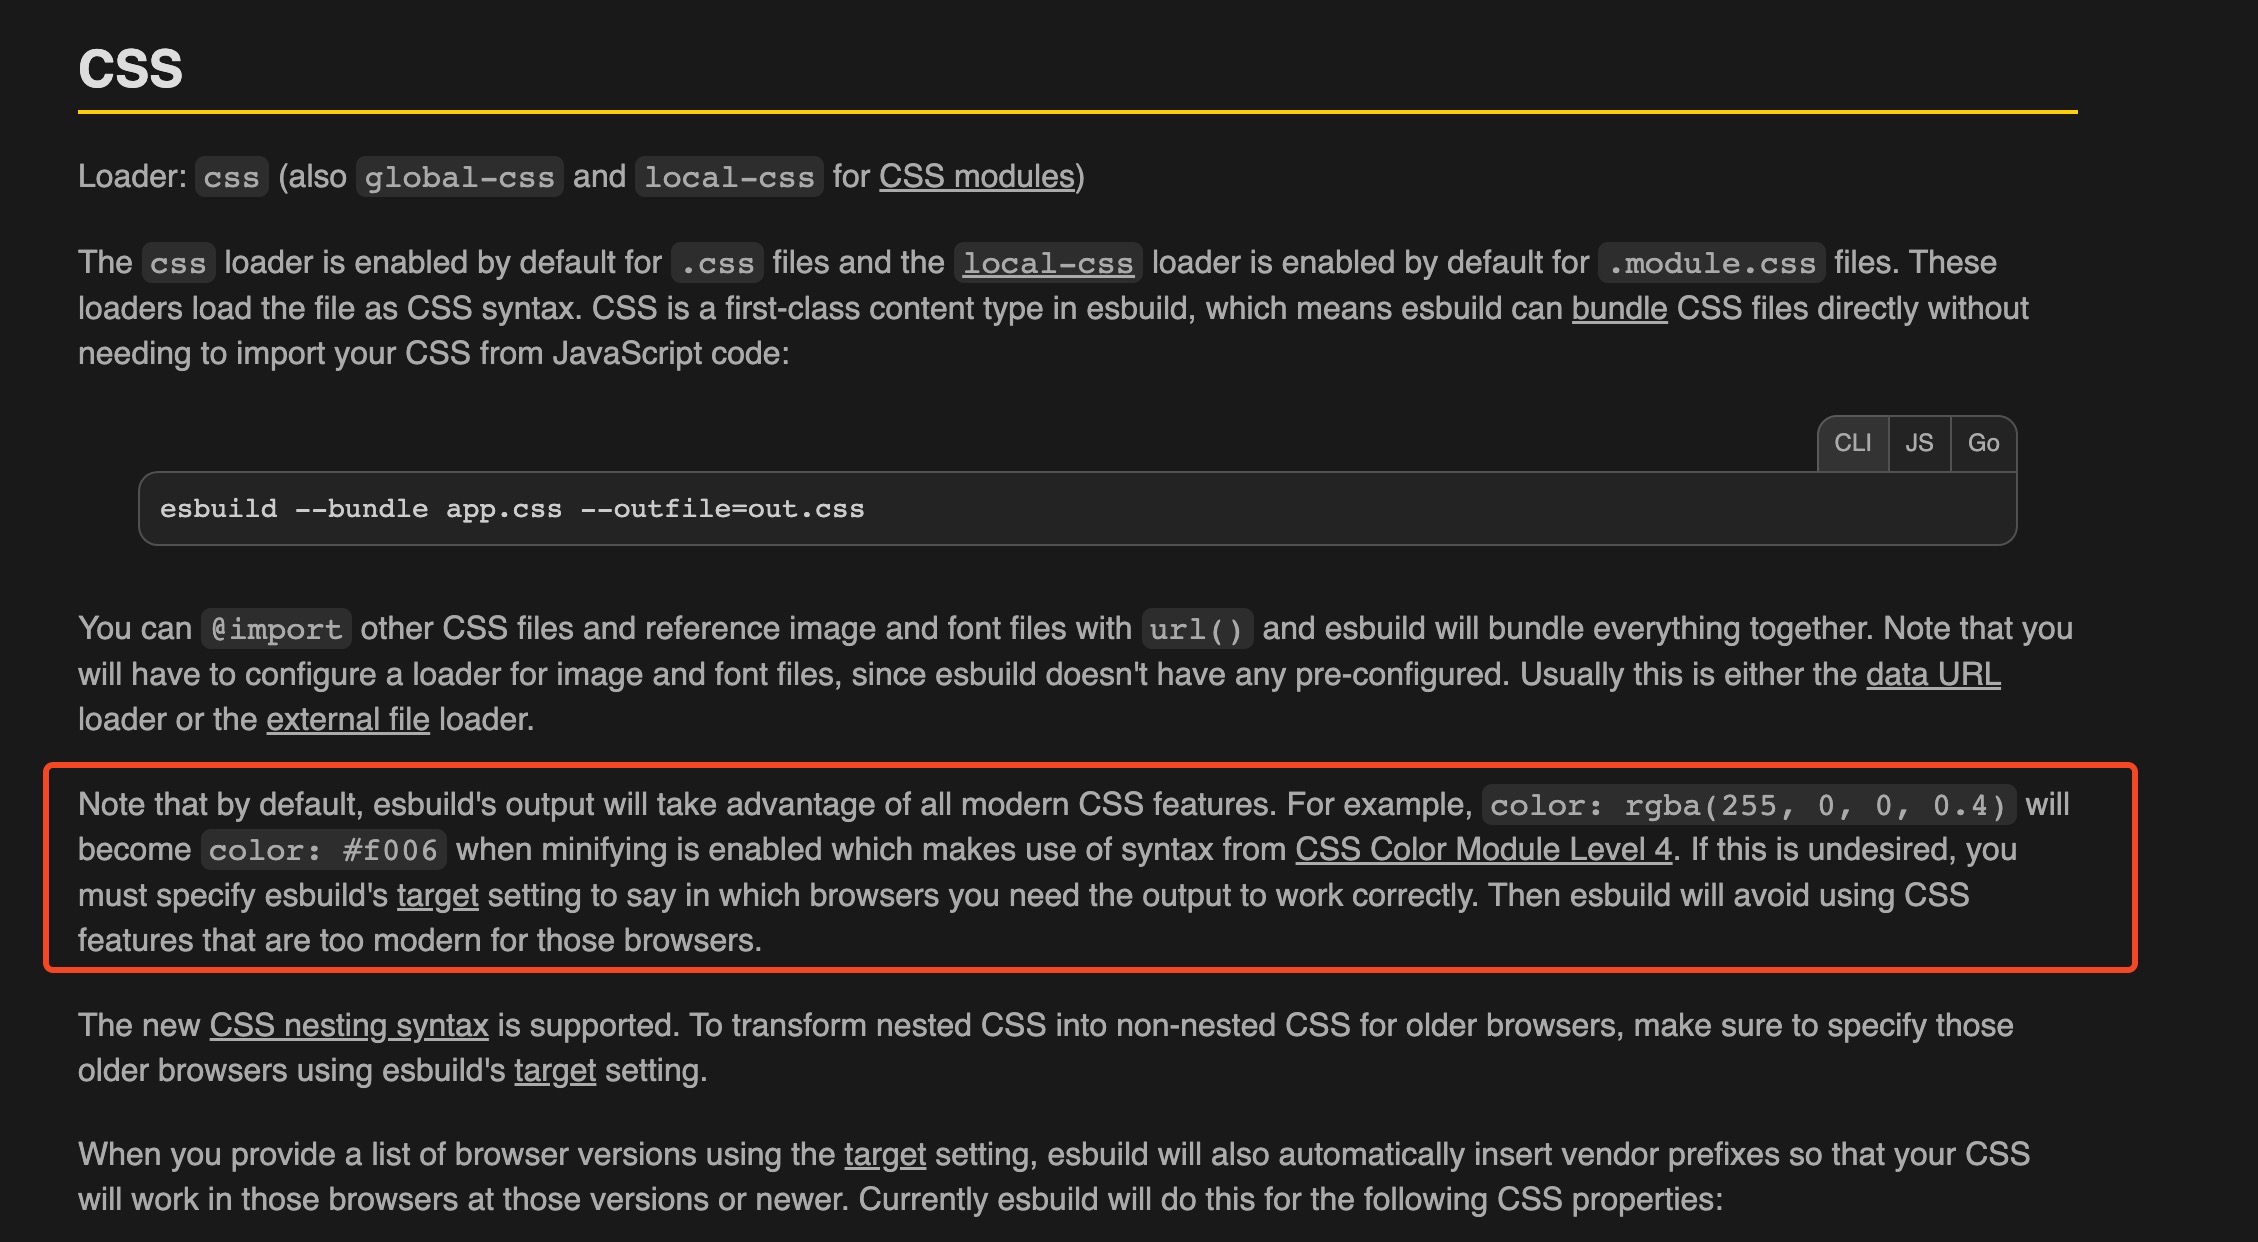
简单来说,默认情况下
Esbuild的输出将利用所有现代CSS的特性,因此在使用color: rgba()和CSS 嵌套语法的情况下会进行语法的转换和支持。若无法满足运行载体(大多为浏览器)的需求,那么需要为Esbuild指定特定的构建目标( Vite 中为build.cssTarget)。使用插件后,
plugin-legacy插件会覆盖项目build.target的配置项。["es2020", "edge79", "firefox67", "chrome64", "safari12"]。全局注入
import.meta.env.LEGACY常量,值为__VITE_IS_LEGACY__,只有在构建阶段生效,renderChunk阶段会将其替换为已知的布尔值,DEV和SSR阶段无效。
legacyPostPlugin
源码结构如下,可以看出在构建的 post 阶段会暴露出四个钩子,configResolved、renderChunk、transformIndexHtml、generateBundle。
const legacyPostPlugin = {
  name: 'vite:legacy-post-process',
  enforce: 'post',
  apply: 'build',
  configResolved(_config) {
    // ...
  },
  async renderChunk(raw, chunk, opts) {
    // ...
  },
  transformIndexHtml(html, { chunk }) {
    // ...
  },
  generateBundle(opts, bundle) {
    // ...
  }
};configResolved 钩子的关注点
阅读以下源码
function configResolved(_config) {
  if (_config.build.lib) {
    throw new Error('@vitejs/plugin-legacy does not support library mode.');
  }
  config = _config;
  if (!genLegacy || config.build.ssr) {
    return;
  }
  /**
   * browserslistLoadConfig 为获取根目录下的 package.json 中的配置项。
   * config = module[package.json]
   * return
   * config[process.env.BROWSERSLIST_ENV] ||
   * config[process.env.NODE_ENV] ||
   * config["production"] ||
   * config.defaults
   */
  targets =
    options.targets ||
    browserslistLoadConfig({ path: config.root }) ||
    'last 2 versions and not dead, > 0.3%, Firefox ESR';
  isDebug && console.log('[@vitejs/plugin-legacy] targets:', targets);
  const getLegacyOutputFileName = (
    fileNames,
    defaultFileName = '[name]-legacy-[hash].js'
  ) => {
    if (!fileNames) {
      return path.posix.join(config.build.assetsDir, defaultFileName);
    }
    return chunkInfo => {
      let fileName =
        typeof fileNames === 'function' ? fileNames(chunkInfo) : fileNames;
      if (fileName.includes('[name]')) {
        fileName = fileName.replace('[name]', '[name]-legacy');
      } else {
        fileName = fileName.replace(/(.+)\.(.+)/, '$1-legacy.$2');
      }
      return fileName;
    };
  };
  // 确定 legacy 产物的输出形式
  const createLegacyOutput = (options2 = {}) => {
    return {
      ...options2,
      format: 'system',
      entryFileNames: getLegacyOutputFileName(options2.entryFileNames),
      chunkFileNames: getLegacyOutputFileName(options2.chunkFileNames)
    };
  };
  const { rollupOptions } = config.build;
  const { output } = rollupOptions;
  if (Array.isArray(output)) {
    rollupOptions.output = [...output.map(createLegacyOutput), ...output];
  } else {
    rollupOptions.output = [createLegacyOutput(output), output || {}];
  }
}这个插件的主要能力为通过 rollupOptions.output 配置项,在输出产物中额外确定并添加 legacy 产物的输出格式。
renderChunk 钩子的关注点
在 renderChunk 中主要分为两个部分的处理,分别是对于legacy模块和非legacy模块的处理。
legacy模块的处理
代码处理流程如下:
async function renderChunk(raw, chunk, opts) {
  // ... 略去非 legacy 部分的处理及其不相关部分。
  opts.__vite_skip_esbuild__ = true;
  opts.__vite_force_terser__ = true;
  opts.__vite_skip_asset_emit__ = true;
  const needPolyfills =
    options.polyfills !== false && !Array.isArray(options.polyfills);
  const sourceMaps = !!config.build.sourcemap;
  const babel2 = await loadBabel();
  const result = babel2.transform(raw, {
    babelrc: false,
    configFile: false,
    compact: !!config.build.minify,
    sourceMaps,
    inputSourceMap: void 0,
    presets: [
      // forcing our plugin to run before preset-env by wrapping it in a
      // preset so we can catch the injected import statements...
      [
        () => ({
          plugins: [
            recordAndRemovePolyfillBabelPlugin(legacyPolyfills),
            replaceLegacyEnvBabelPlugin(),
            wrapIIFEBabelPlugin()
          ]
        })
      ],
      [
        (await import('@babel/preset-env')).default,
        // 确定 @babel/preset-env 插件的配置项
        createBabelPresetEnvOptions(targets, {
          needPolyfills,
          ignoreBrowserslistConfig: options.ignoreBrowserslistConfig
        })
      ]
    ]
  });
}TIP
值得注意的是引入当前插件会在原先 bundle 的基础上备份出 legacy-bundle。以下参数仅针对于 legacy-bundle 有效,normol-bundle 参数值均为 undefined。
__vite_skip_esbuild__: 配置为true可以跳过vite:esbuild-transpile插件(该插件的功能为压缩模块或将TypeScript转译为js模块)的renderChunk阶段。避免在legacy模块上使用esbuild转换,因为它会生成legacy-unsafe代码 - 例如将对象属性重写为简写。把a={name}转成a={name:name}最终还会生成a={name}。会导致swc\babel\typescript之类的插件无法正常使用。__vite_force_terser__: 对于legacy模块,强制使用terser来进行压缩。只有在不禁用最小化且非压缩ES lib的情况下才会生效,因为这将完全排除terser插件。__vite_skip_asset_emit__:在generateBundle钩子中,Vite会删除来自lagacy bundle的资源,来避免生成重复的资源。但这仍然需要耗费计算资源。因此,Vite添加了此标志,尽可能地避免最初的资源生成。
从以上源码中可以知道,该阶段会借助 babel 的能力来解析代吗,解析流程可以查看 Vite 注入的 @babel/preset-env、recordAndRemovePolyfillBabelPlugin, replaceLegacyEnvBabelPlugin, wrapIIFEBabelPlugin 插件。需要注意的是 Babel 会先执行 @babel/preset-env,检测并注入模块中所需要的 Polyfill。
@babel/preset-env插件会根据配置项检测模块中所需的Polyfill,并通过import的形式按需注入core-js的子模块。replaceLegacyEnvBabelPlugin插件代码如下:jsfunction replaceLegacyEnvBabelPlugin() { return ({ types: t }) => ({ name: 'vite-replace-env-legacy', visitor: { Identifier(path2) { if (path2.node.name === legacyEnvVarMarker) { path2.replaceWith(t.booleanLiteral(true)); } } } }); }
vite:define 插件在 transform 阶段会将 import.meta.env.LEGACY 值替换为 legacyEnvVarMarker 的值( __VITE_IS_LEGACY__ ),改插件在 renderChunk 阶段将 legacyEnvVarMarker (__VITE_IS_LEGACY__) 替换为具体的值。在 legacy module 模块中替换的值为 true,在 normal module 模块替换的值则为 false。不同模块的实现方式有所不同,不同的原因大致可能是因为这里刚好借助 Babel 的能力来进行解析,而更加简单直接的实现方式则为文本替换(normal module 中的实现方式)。
// normal module 中的实现方式
if (!isLegacyChunk(chunk, opts)) {
  if (raw.includes(legacyEnvVarMarker)) {
    const re = new RegExp(legacyEnvVarMarker, 'g');
    let match;
    while ((match = re.exec(raw))) {
      ms.overwrite(
        match.index,
        match.index + legacyEnvVarMarker.length,
        'false'
      );
    }
  }
}

// legacy module 中的实现方式
const babel = await loadBabel();
const result = babel.transform(raw, {
  babelrc: false,
  configFile: false,
  compact: !!config.build.minify,
  sourceMaps,
  inputSourceMap: undefined,
  presets: [
    [
      () => ({
        plugins: [
          recordAndRemovePolyfillBabelPlugin(legacyPolyfills),
          replaceLegacyEnvBabelPlugin(),
          wrapIIFEBabelPlugin()
        ]
      })
    ],
    [
      (await import('@babel/preset-env')).default,
      createBabelPresetEnvOptions(targets, {
        needPolyfills,
        ignoreBrowserslistConfig: options.ignoreBrowserslistConfig
      })
    ]
  ]
});
function replaceLegacyEnvBabelPlugin(): BabelPlugin {
  return ({ types: t }): BabelPlugin => ({
    name: 'vite-replace-env-legacy',
    visitor: {
      Identifier(path) {
        if (path.node.name === legacyEnvVarMarker) {
          path.replaceWith(t.booleanLiteral(true));
        }
      }
    }
  });
}recordAndRemovePolyfillBabelPlugin插件代码如下:jsfunction recordAndRemovePolyfillBabelPlugin(polyfills) { return ({ types: t }) => ({ name: 'vite-remove-polyfill-import', post({ path: path2 }) { path2.get('body').forEach(p => { // 判断节点是否为 import 声明 if (t.isImportDeclaration(p.node)) { polyfills.add(p.node.source.value); p.remove(); } }); } }); }
Vite 在 renderChunk 阶段时, chunk 的代码已经解析完了 import 和 export,也就是说这个阶段正常情况下理应各个模块不应该存在 import 和 export。那么也就是说若再次收集到的 import 或 export 则必定是 babel 在 @babel/preset-env 插件中注入的 polyfill。明白了这一点那么这个插件所做的工作则为收集所注入的 polyfill 信息。 renderChunk 之后是不会再解析 import 申明语法,而直接在此注入 Polyfill 代码会存在重复代码问题。Vite 决策为抽离项目中各个模块所依赖的 Polyfill,作为独立的 bundle 在 index.html 中加载并执行。因此源码中 p.remove() 代码片段就很好理解了。既然 polyfill 可以作为独立的 bundle 抽离出来,那么其他模块就不需要再特意注入 polyfill,当其余模块收集完成后会将注入的 import 语句进行删除。
wrapIIFEBabelPlugin插件代码如下:jsfunction wrapIIFEBabelPlugin() { return ({ types: t, template }) => { const buildIIFE = template(';(function(){%%body%%})();'); return { name: 'vite-wrap-iife', post({ path: path2 }) { if (!this.isWrapped) { this.isWrapped = true; path2.replaceWith( t.program(buildIIFE({ body: path2.node.body })) ); } } }; }; }
在源码最外层添加立即执行函数。包裹原因可参考 PR,主要解决全局作用域污染。
非 legacy 模块的处理
执行源码如下:
// 通过监测支持 import.meta.url 和 动态导入 来判断是否为现代浏览器
const detectModernBrowserDetector =
  'import.meta.url;import("_").catch(()=>1);async function* g(){};';
const modernChunkLegacyGuard = `export function __vite_legacy_guard(){${detectModernBrowserDetector}};`;
async function renderChunk(raw, chunk, opts) {
  if (!isLegacyChunk(chunk, opts)) {
    // options.modernPolyfills = true。不建议设置为 true,因为 core-js@3 非常激进的将 JS 前沿的特性进行注入。甚至目标为对原生 ESM 的支持都需要注入 15kb。
    if (
      options.modernPolyfills &&
      !Array.isArray(options.modernPolyfills)
    ) {
      await detectPolyfills(raw, { esmodules: true }, modernPolyfills);
    }
    const ms = new MagicString(raw);
    // 在入口处注入判断是否为现代浏览器
    if (genLegacy && chunk.isEntry) {
      ms.prepend(modernChunkLegacyGuard);
    }
    // 确定所注入的 legacyEnvVarMarker 值为 false。正常情况下和后续的 tree-sharking 所关联。
    if (raw.includes(legacyEnvVarMarker)) {
      const re = new RegExp(legacyEnvVarMarker, 'g');
      let match;
      while ((match = re.exec(raw))) {
        ms.overwrite(
          match.index,
          match.index + legacyEnvVarMarker.length,
          'false'
        );
      }
    }
    if (config.build.sourcemap) {
      return {
        code: ms.toString(),
        map: ms.generateMap({ hires: true })
      };
    }
    return {
      code: ms.toString()
    };
  }
}在支持现代浏览器的 polyfill 从上述源码中可以划分以下几个部分:
options.modernPolyfills配置的处理。类似借助babel的@babel/preset-env插件来做 检测(不改变源码) 并进行收集。jsif (options.modernPolyfills && !Array.isArray(options.modernPolyfills)) { await detectPolyfills(raw, { esmodules: true }, modernPolyfills); }在入口模块处添加检测,用来判断是否为现代浏览器。
jsconst detectModernBrowserDetector = 'import.meta.url;import("_").catch(()=>1);async function* g(){};'; const modernChunkLegacyGuard = `export function __vite_legacy_guard(){${detectModernBrowserDetector}};`; const ms = new MagicString(raw); if (genLegacy && chunk.isEntry) { ms.prepend(modernChunkLegacyGuard); }确定
legacyEnvVarMarker的值为false。jsif (raw.includes(legacyEnvVarMarker)) { const re = new RegExp(legacyEnvVarMarker, 'g'); let match; while ((match = re.exec(raw))) { ms.overwrite( match.index, match.index + legacyEnvVarMarker.length, 'false' ); } }
transformIndexHtml 钩子的关注点
收集到的 polyfill 集合作为全新的一个模块,其代码如下:
function polyfillsPlugin(imports, externalSystemJS) {
  return {
    name: 'vite:legacy-polyfills',
    resolveId(id) {
      if (id === polyfillId) {
        return id;
      }
    },
    load(id) {
      if (id === polyfillId) {
        return (
          // imports 是在 renderChunk 阶段收集到的所有需要兼容的 polyfill。
          [...imports].map(i => `import "${i}";`).join('') +
          (externalSystemJS ? '' : 'import "systemjs/dist/s.min.js";')
        );
      }
    }
  };
}在 generateBundle 阶段再次单独调用 Vite 进行构建 polyfill bundle。最后会生成现代浏览器支持 esmodule 的产物和旧版本浏览器支持 nomodule 的产物。
async function buildPolyfillChunk(
  name,
  imports,
  bundle,
  facadeToChunkMap,
  buildOptions,
  externalSystemJS
) {
  let { minify, assetsDir } = buildOptions;
  minify = minify ? 'terser' : false;
  const res = await build({
    // so that everything is resolved from here
    root: __dirname,
    configFile: false,
    logLevel: 'error',
    plugins: [polyfillsPlugin(imports, externalSystemJS)],
    build: {
      write: false,
      target: false,
      minify,
      assetsDir,
      rollupOptions: {
        input: {
          [name]: polyfillId
        },
        output: {
          format: name.includes('legacy') ? 'iife' : 'es',
          manualChunks: undefined
        }
      }
    }
  });
  // ...
}注意
plugin-legacy内部是使用terser来对代码压缩。因此在配置了minify的时候请务必按照terser依赖。useBuiltIns: 'usage'表示有用到的polyfill才引入。可以对比一下useBuiltIns: 'entry'从配置项中和
vite-wrap-iife插件(作为babel的预设插件首个被执行)可以看出
const options = {
  output: {
    format: name.includes('legacy') ? 'iife' : 'es',
    manualChunks: undefined
  }
};

function wrapIIFEBabelPlugin() {
  return ({ types: t, template }) => {
    const buildIIFE = template(';(function(){%%body%%})();');

    return {
      name: 'vite-wrap-iife',
      post({ path }) {
        if (!this.isWrapped) {
          this.isWrapped = true;
          path.replaceWith(t.program(buildIIFE({ body: path.node.body })));
        }
      }
    };
  };
}polyfill chunk 是立即执行函数。
之后将 polyfill chunk 注入到 bundle 中作为新的 bundle。
async function buildPolyfillChunk(
  name,
  imports,
  bundle,
  facadeToChunkMap,
  buildOptions,
  externalSystemJS
) {
  // ...
  const _polyfillChunk = Array.isArray(res) ? res[0] : res;
  if (!('output' in _polyfillChunk)) return;
  const polyfillChunk = _polyfillChunk.output[0];

  // associate the polyfill chunk to every entry chunk so that we can retrieve
  // the polyfill filename in index html transform
  for (const key in bundle) {
    const chunk = bundle[key];
    if (chunk.type === 'chunk' && chunk.facadeModuleId) {
      facadeToChunkMap.set(chunk.facadeModuleId, polyfillChunk.fileName);
    }
  }

  // add the chunk to the bundle
  bundle[polyfillChunk.name] = polyfillChunk;
}实现上的注意点
需要检测 Promise 的 Polyfill 是否缺失
Vite 的项目默认以
ESM为基准进行开发,ESMfeature 的能力需要依赖于SystemJS来进行Polyfill。而SystemJS包需要依赖Promise,但若用户没有在模块中引入Promise,即如下写法:jsimport react from 'react'; console.log(react);则会导致
babel不会注入Promise的polyfill。但事实上模块使用了ESM,是需要依赖Promise的。在
@vite/legacy-plugin中也做了相应的处理。jsconst legacyGenerateBundlePlugin = { name: 'vite:legacy-generate-polyfill-chunk', apply: 'build', async generateBundle(opts, bundle) { // ... // legacy bundle if (legacyPolyfills.size || genDynamicFallback) { if (!legacyPolyfills.has('es.promise')) { // check if the target needs Promise polyfill because SystemJS relies // on it detectPolyfills('Promise.resolve()', targets, legacyPolyfills); } isDebug && console.log( '[@vitejs/plugin-legacy] legacy polyfills:', legacyPolyfills ); await buildPolyfillChunk( 'polyfills-legacy', legacyPolyfills, bundle, facadeToLegacyPolyfillMap, // force using terser for legacy polyfill minification, since esbuild // isn't legacy-safe config.build, options.externalSystemJS ); } } };当收集到的
Polyfill中没有包含es.promise,则会自动注入es.promise相关的Polyfill。jsfunction detectPolyfills(code, targets, list) { const { ast } = loadBabel().transform(code, { ast: true, babelrc: false, configFile: false, presets: [ [ 'env', { targets, modules: false, useBuiltIns: 'usage', corejs: { version: 3, proposals: false }, shippedProposals: true, ignoreBrowserslistConfig: true } ] ] }); for (const node of ast.program.body) { if (node.type === 'ImportDeclaration') { const source = node.source.value; if ( source.startsWith('core-js/') || source.startsWith('regenerator-runtime/') ) { list.add(source); } } } }确保构建出来的
Polyfill一定包含es.promise相关的Polyfill。同时也确保了SystemJs的正常执行。注入内敛JS代码
Polyfill会在index.html中注入 Safari 10.1 nomodule fix、SystemJS 初始化和动态导入回退的内敛 JS 代码。Safari 10.1 nomodule fix
Safari 11 版本之前是不支持
type=nomodule,而支持type=module。但是对于type=nomodule标签的脚本也会进行加载和执行。会导致执行两遍的代码,这里 有具体的解决方案可供参考。动态导入回退
对于
safari 10.1版本来说支持type=module但不支持type=nomodule和dynamic import。因此就会导致在type=module脚本中使用动态导入模块时会出现报错现象,因此需要对dynamic import做回退机制。回退使用SystemJS来进行加载模块。html<script type="module"> !(function () { try { new Function('m', 'return import(m)'); } catch (o) { console.warn( 'vite: loading legacy build because dynamic import is unsupported, syntax error above should be ignored' ); var e = document.getElementById('vite-legacy-polyfill'), n = document.createElement('script'); n.src = e.src; n.onload = function () { System.import( document .getElementById('vite-legacy-entry') .getAttribute('data-src') ); }; document.body.appendChild(n); } })(); </script> <script nomodule id="vite-legacy-entry" data-src="./assets/index-legacy.0bf6a3bb.js" > System.import( document .getElementById('vite-legacy-entry') .getAttribute('data-src') ); </script>SystemJS 初始化
对于
Safari低版本(10.1版本及以下)和支持nomodule标签而不支持module浏览器来说需要通过SystemJS来动态加载入口模块。jsSystem.import( document .getElementById('vite-legacy-entry') .getAttribute('data-src') );
Content Security Policy 的处理
由于第二点解释了 Vite 需要往 index.html 中注入内敛 JS 代码。因此当页面配置了 CSP,就会阻塞内敛代码的执行。一个很简单的解决方案是使用 CSP Hash 来解决这个问题,详细介绍和注意事项可以参照这一篇 文章 。插件内部已经生成好了各个内敛脚本的 Hash 值:
viteLegacyPlugin.cspHashes = [
  createHash('sha256').update(safari10NoModuleFix).digest('base64'),
  createHash('sha256').update(systemJSInlineCode).digest('base64'),
  createHash('sha256').update(dynamicFallbackInlineCode).digest('base64')
];可以直接配置在 script-src 上即可。